PC Bits and Pieces
Thursday, June 23, 2005
Sunday, June 19, 2005
Setting up an SMC Hardware Router
Required equipment: Router (like the SMC Barricade), one Ethernet cable to connect the router to the modem, one cable for connecting each computer to the router
Getting Started
The first step is plugging everything in. Most home routers will be like my SMC Barricade, with four 10/100-BaseT Ethernet ports and one WAN (Wide Area Network) port. First use the specified Ethernet cable (mine was included with the router) to connect the cable/DSL modem port to the WAN port. Some routers use a crossover cable for this connection, others use straight-through. Check the router documentation to be sure.
After connecting the router to the modem, connect each computer to the router. Plug the router in and turn the power on. You should see the status light appear for each connected port on the router.
Note: This article assumes that you’re using a hardware router to share a high-speed Internet connection (cable or DSL), but some routers also have a phone jack for connection to a dial-up modem. Other than connecting the modem to the router’s phone jack, the setup steps should be the same.
Software
In order to use the DHCP services common to most hardware routers, you need to have Open Transport installed and enabled on your Mac. This is probably already installed if you’ve been using your high-speed Internet connection, but you can check the Apple Software Updates site to make sure you have the proper software.
Configuring the Router
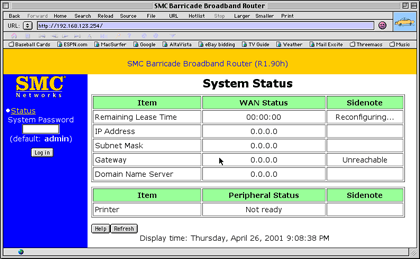
Most hardware routers use Web-based configuration, to allow for use by Macs, Windows, or whatever. Open your browser and connect to the address mentioned in the manual (192.168.123.254 for the Barricade). You should see the following screen.
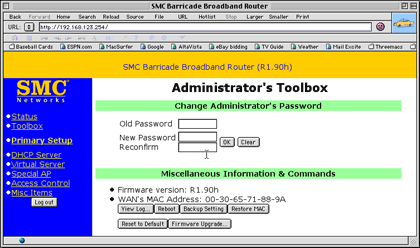
Many Internet providers record your computer’s Ethernet hardware address (also known as the MAC address, but nothing to do with Macintosh), so that only that computer can use the high-speed service. If this is the case with your provider, do the configuration from the Web browser on the computer you’ve used to connect to the Internet. Log in, then select Toolbox. Push the Clone MAC button to copy the original computer’s Ethernet address, which will tell the router to act like your normal computer. (You don’t need to do this if your provider doesn’t track your MAC address.) The button will change to Restore MAC, which you will need if you want to restore the router to its original MAC address later.

Note: The ability to clone the MAC address will vary from router to router. A second option is to contact your Internet provider and register the router’s MAC Address as your connection.
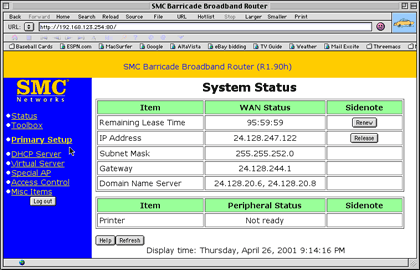
Return to the Primary Setup page and click the Renew button to grab an Internet address if you haven’t already. The page should say Reconfiguring until it grabs an address (this may take a minute or two). Don’t try to use any Internet programs until it comes back with an address. Once you have an address, you should be able to surf and e-mail as normal.

Configuring Your Computers
Most hardware routers use DHCP, which manages the Internet connection automatically for all the connected computers. To set up your Mac for DHCP, open the TCP/IP control panel and set configure to Use DHCP Server. Leave the other settings (Name Server Address, specifically) the same as they were before. Then close the control panel and save changes if prompted.
For Windows and other computers, follow the instructions for using DHCP from the computer’s help files or the router manual.
Troubleshooting
Once you start up a router and configure it, you shouldn’t need to change anything. If you ever run into a problem getting through to the Internet (it’s happened a couple of times in the week I’ve had the router), turn the router off and on, then repeat the configuration steps above. You may also need to choose the Reboot button from the Toolbox screen you see above (don’t reboot your computer, just the router).
Upgrading Firmware
As time goes on, the router maker may provide firmware updates via its Web site. Firmware upgrades allow them to fix bugs or improve the router itself. After downloading new firmware, use the Firmware button on the Toolbox page and follow the instructions.
Note: Some routers require that you use a Windows-based PC to upgrade firmware. If this is the case with yours, you can run the updater under an emulator like Virtual PC or borrow a friend’s PC for the task.
For more information: http://www.atpm.com/7.06/router.shtml
Saturday, June 04, 2005
Deleting forgotten Content Advisor password
It happened to me that I was just entering the password for the Content Advisor of ie6 and I guess I may have hit one wrong key and it altered the password that I wanted to have. When it happened I was stucked re-entering the password that I though was right. But to no avail. If you get caught on the same scenario here is the resolution:
Access your registry and tweak it:
1. Click Start, Run
2. At the run prompt type: regedit and press enter
3. Look for this folder:
HKEY_LOCAL_MACHINE\SOFTWARE\MicrosoftWindows\CurrentVersion\Policies\Ratings
4. Select the icon called Key in the right-hand pane and press delete.
5. Close regedit.
6. Start Internet Explorer.
7. Goto Tools, Internet Options....
8. Select Content tab and click Disable. When asked for password don't enter anything just click OK. This will disable Content advisor. since there's no longer a password. You can enable it again as soon as you think of an easier password.
Icons get corrupted on Desktop and Task bar
| At certain point in time especially when you are running a lot of Macros with Excel or MS Access, sometimes the registry get corrupted for no reason and this corruption affects the icons on your desktop or taks bar getting ugly (such as the 16 color mode). This is a known issue, caused by an incorrect data assigned to Shell Icon BPP registry value. Re-setting it to 16 resolves the problem. Use the following steps:
|  |
You will need to restart Windows for the changes to take effect. If that does not help, or to apply the change instantly, try this:
-
Right-click Desktop, choose Properties, Appearance Tab.
-
Click Advanced button, choose Icon from the drop-down list
-
Set it's size to 31 and press OK, OK
-
Repeat the steps (1-3) and set the Icon size to 32 (defaults)
More Reference: http://windowsxp.mvps.org/repairicons.htm
Thursday, June 02, 2005
Browse the Web with Content Advisor in IE6
Internet Explorer 6 has new built-in Security feature which enable you to control web access. This is done with the use of the content advisor which Microsoft had added. This is pretty good especially for Parents who would like to make sure the kids are surfing only to the prepared site listed in the Content Advisor list.
The following link gives you the necessary information to perform the task you want to do.
http://www.microsoft.com/windows/ie/using/howto/security/contentadv/config.mspx#ECAA
Wednesday, June 01, 2005
How to limit ie access in a controlled environment
A couple times people have asked on the board whether it is at all possible to create a truly controlled environment, whether it be for a company intranet, or an Internet café terminals.
There are quite a few things you can do, depending on how controlled the environment needs to be. Assuming you have already set the most basic restrictions using administrative tools, here are some additional steps you can take. Note that these steps require making changes to the Windows Registry. Do not attempt to make any of these changes unless you feel completely comfortable editing the registry, as it can otherwise cause your computer to malfunction.
ie toolbar Restrictions
Reg Key: HKCU\Software\Microsoft\Windows\CurrentVersion\Policies\Explorer
Create a DWORD key SpecifyDefaultButtons and give it a value of 1
to remove a button from the toolbar, create additional DWORD keys with a value noted below:
Key: Value = EffectBtn_Back: 2 = Back button and menu item.Btn_Forward: 2 = Forward button and menu item.Btn_Stop: 2 = Stop button and menu item.Btn_Refresh: 2 = Refresh button and menu item.Btn_Home: 2 = Home button and menu item.Btn_Search: 2 = Search button and menu item.Btn_History: 2 = History button and menu item.Btn_Favorites: 2 = Favorites button and menu item.Btn_Media: 2 = Media button and menu item. [Only available with ie 6]NoBandCustomize: 1 = No adding or removing menu or toolbars.NotoolbarCustomize: 1 = Customizing the toolbar.
Note that these keys will remove both the toolbar button and the menu item, successfully disabling access to that particular functionality.
ie Restrictions
Reg Key: HKCU\Software\Policies\Microsoft\Internet Explorer\Restrictions
Create a DWORD key:NoBrowserBars: Disable changes to browsers bars.NoBrowserClose: Disable the option of closing Internet Explorer.NoBrowserContextMenu: Disable right-click context menu.NoBrowserOptions: Disable the tools / Internet Options menu.NoBrowserSaveAs: Disable the ability to Save AsNofavorites: Disable the Favorites.NofileNew: Disable the File / NewNofileOpen: Disable the File / OpenNofindFiles: Disable the Find FilesNoSelectDownloadDir: Disable the option to change download directoryNoTheaterMode: Disable the Full Screen viewNoOpeninNewWnd: Disable Open in New WindowNoViewSource: Disable the ability to view the page source HTML.NoNavButtons: Disables the Forward and Back buttonsNoPrinting: Remove Print and Print Preview from the File menu.AlwaysPromptWhenDownload: Always prompt user when downloading files.
Give it a value of 1 to turn on the restriction
Reg Key: HKCU\Software\Policies\Microsoft\Internet Explorer\toolbars\Restrictions
Create a DWORD key:NotoolbarOptions: Disables adding, removing, or moving toolbars.
Give it a value of 1 to turn on the restriction.
Keyboard Control
Finally, there are times when complete keyboard control is required (such as disallowing Ctrl commands). If buying special terminal keyboards is not an option, do not worry. There are ways in which you can "turn off" any key on the keyboard, by altering the scan code mappings for your keyboard.
Reg Key: HKLM\SYSTEM\CurrentControlSet\Control\Keyboard Layout
IMPORTANT: There is also a Keyboard Layouts key (notice the plural form) under the Control key, but that key should not be modified.
In the Keyboard Layout key, the Scancode Map value (REG_BINARY) must be added. The first and second DWORDS store header information and should be set to all zeroes for the current version of the Scan Code Mapper. The third DWORD entry holds a count of the total number of mappings that follow, including the null terminating mapping. The minimum count would therefore be 1 (no mappings specified). The individual mappings follow the header. Each mapping is one DWORD in length and is divided into two WORD length fields. Each WORD field stores the scan code for a key to be mapped.
Once the map is stored in the registry, the system must be rebooted for the mappings to take effect. Note that if the mapping of a scan code is necessary on a keypress, the step is performed in user mode just before the scan code is converted to a virtual key. Doing this conversion in user mode can present certain limitations, such as mapping not working correctly when running under Terminal Services.
For the purposes of this tutorial, I will show how to turn off both Ctrl-keys. The following value should be stored in the Scancode Map key:
00000000 00000000 03000000 00001D00 00001DE0 00000000
0x00000000 = Header: Version
0x00000000 = Header: Flags
0x00000003 = Three entries in the map
0x001D0000 = Remove the left CTRL key (0x001D --> 0x00).
0xE01D0000 = Remove the right CTRL key (0xE01D --> 0x00).
0x00000000 = Null terminator
Like I said -- this method can be used to turn off any key on the keyboard. It can also be used to create custom keys, or keys that you normally don't have on your keyboard (such as a mute key). All changes require reboot before going into effect.
More info: http://www.webmasterworld.com/forum21/7542.htm
http://www.microsoft.com
